* fix: remove BIGDL_LLM_XMX_DISABLED in mddocs

* fix: remove set SYCL_CACHE_PERSISTENT=1 in example

* fix: remove BIGDL_LLM_XMX_DISABLED in workflows

* fix: merge igpu and A-series Graphics

* fix: remove set BIGDL_LLM_XMX_DISABLED=1 in example

* fix: remove BIGDL_LLM_XMX_DISABLED in workflows

* fix: merge igpu and A-series Graphics

* fix: textual adjustment

* fix: textual adjustment

* fix: textual adjustment
11 KiB
Run Text Generation WebUI on Intel GPU
The oobabooga/text-generation-webui provides a user friendly GUI for anyone to run LLM locally; by porting it to ipex-llm, users can now easily run LLM in Text Generation WebUI on Intel GPU (e.g., local PC with iGPU, discrete GPU such as Arc, Flex and Max).
See the demo of running LLaMA2-7B on an Intel Core Ultra laptop below.
 |
| You could also click here to watch the demo video. |
Table of Contents
- Install IPEX-LLM
- Install the WebUI
- Start the WebUI Server
- Using the WebUI
- Advanced Usage
- Troubleshooting
Quickstart
This quickstart guide walks you through setting up and using the Text Generation WebUI with ipex-llm.
A preview of the WebUI in action is shown below:
1. Install IPEX-LLM
To use the WebUI, first ensure that IPEX-LLM is installed. Follow the instructions on the IPEX-LLM Installation Quickstart for Windows with Intel GPU.
After the installation, you should have created a conda environment, named llm for instance, for running ipex-llm applications.
2. Install the WebUI
Download the WebUI
Download the text-generation-webui with IPEX-LLM integrations from this link. Unzip the content into a directory, e.g.,C:\text-generation-webui.
Install Dependencies
Open Miniforge Prompt and activate the conda environment you have created in section 1, e.g., llm.
conda activate llm
Then, change to the directory of WebUI (e.g.,C:\text-generation-webui) and install the necessary dependencies:
cd C:\text-generation-webui
pip install -r requirements_cpu_only.txt
pip install -r extensions/openai/requirements.txt
Note
extensions/openai/requirements.txtis for API service. If you don't need the API service, you can omit this command.
3. Start the WebUI Server
Set Environment Variables
Configure oneAPI variables by running the following command in Miniforge Prompt:
Note
For more details about runtime configurations, refer to this guide.
set SYCL_CACHE_PERSISTENT=1
Launch the Server
In Miniforge Prompt with the conda environment llm activated, navigate to the text-generation-webui folder and execute the following commands (You can optionally lanch the server with or without the API service):
without API service
python server.py --load-in-4bit
with API service
python server.py --load-in-4bit --api --api-port 5000 --listen
Tip
With
--load-in-4bitoption, the models will be optimized and run at 4-bit precision. For configuration for other formats and precisions, refer to this link.
Note
The API service allows user to access models using OpenAI-compatible API. For usage examples, refer to this link
Note
The API server will by default use port
5000. To change the port, use--api-port 1234in the command above. You can also specify using SSL or API Key in the command. Please seethis guide <https://github.com/intel-analytics/text-generation-webui/blob/ipex-llm/docs/12%20-%20OpenAI%20API.md>_ for the full list of arguments.
Access the WebUI
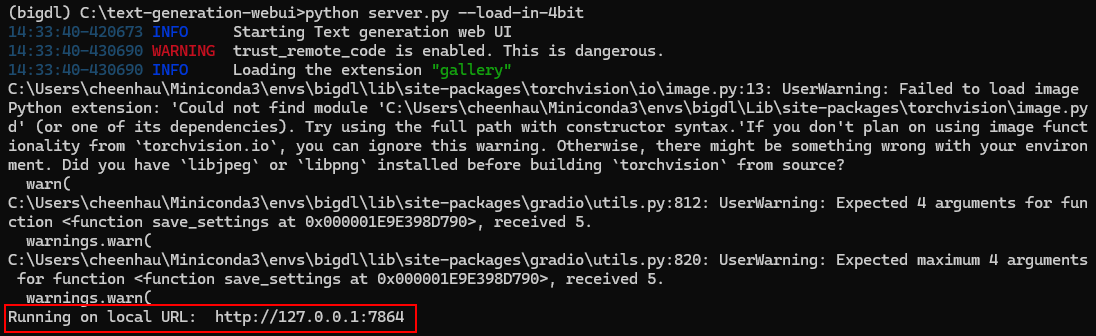
Upon successful launch, URLs to access the WebUI will be displayed in the terminal as shown below. Open the provided local URL in your browser to interact with the WebUI.
4. Using the WebUI
Model Download
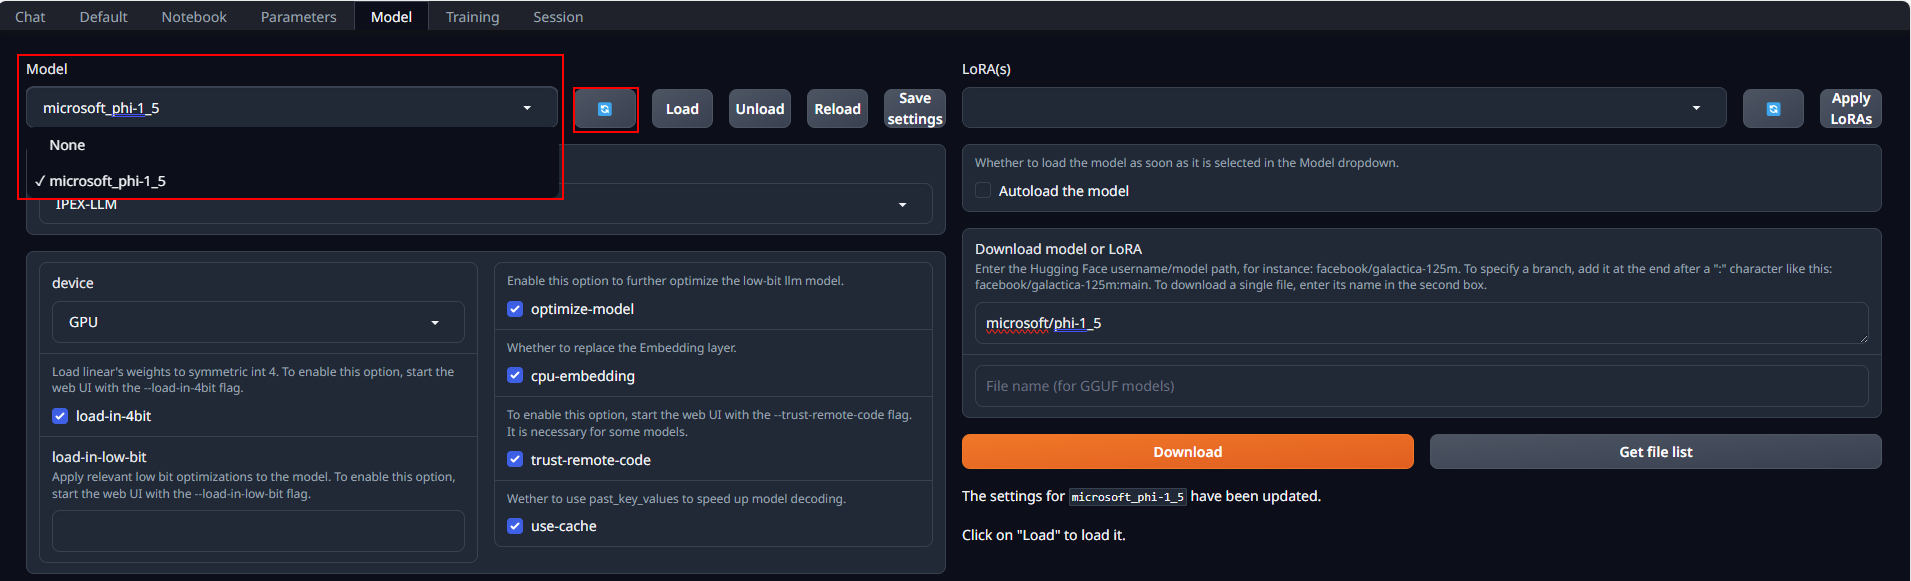
Place Huggingface models in C:\text-generation-webui\models by either copying locally or downloading via the WebUI. To download, navigate to the Model tab, enter the model's huggingface id (for instance, microsoft/phi-1_5) in the Download model or LoRA section, and click Download, as illustrated below.

After copying or downloading the models, click on the blue refresh button to update the Model drop-down menu. Then, choose your desired model from the newly updated list.
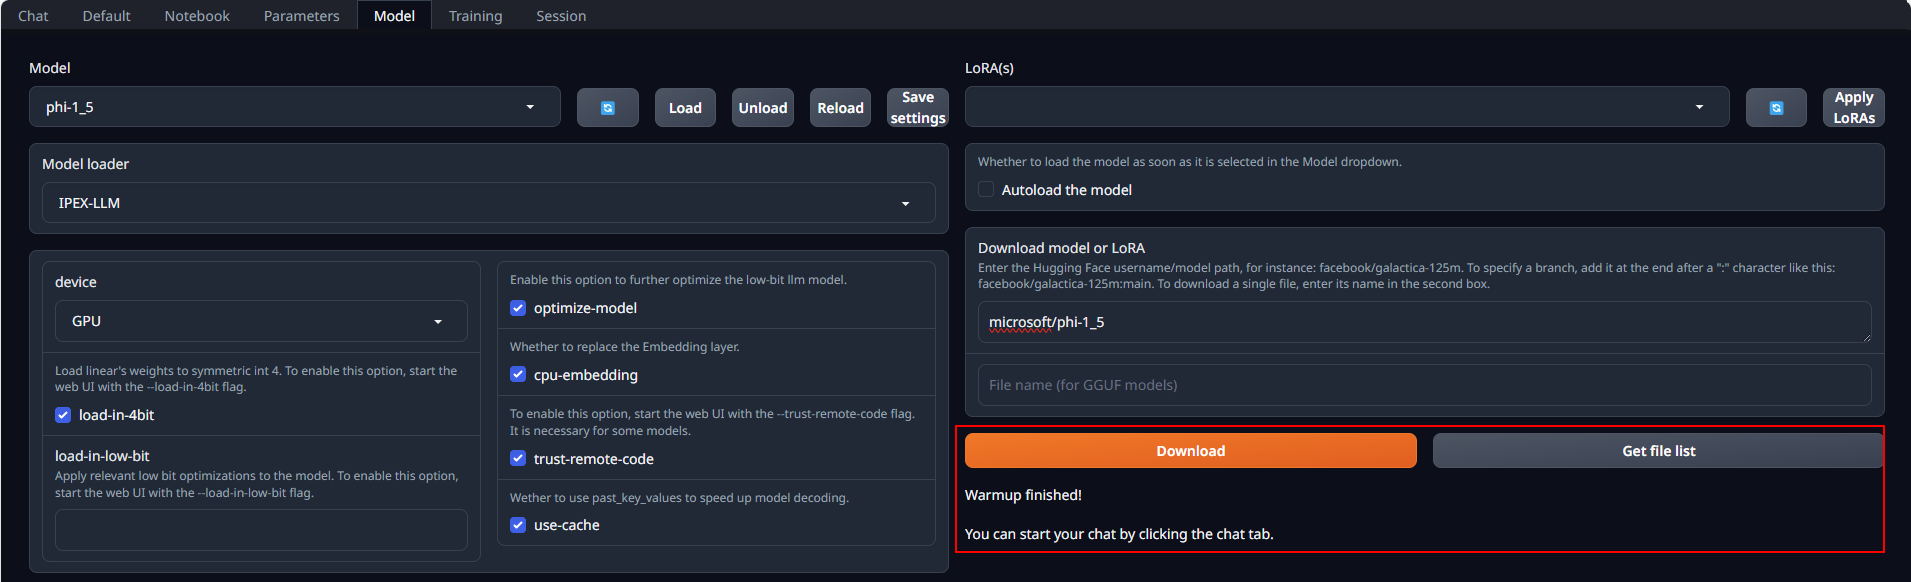
Load Model
Default settings are recommended for most users. Click Load to activate the model. Address any errors by installing missing packages as prompted, and ensure compatibility with your version of the transformers package. Refer to troubleshooting section for more details.
If everything goes well, you will get a message as shown below.
Note
Model loading might take a few minutes as it includes a warm-up phase. This
warm-upstep is used to improve the speed of subsequent model uses.
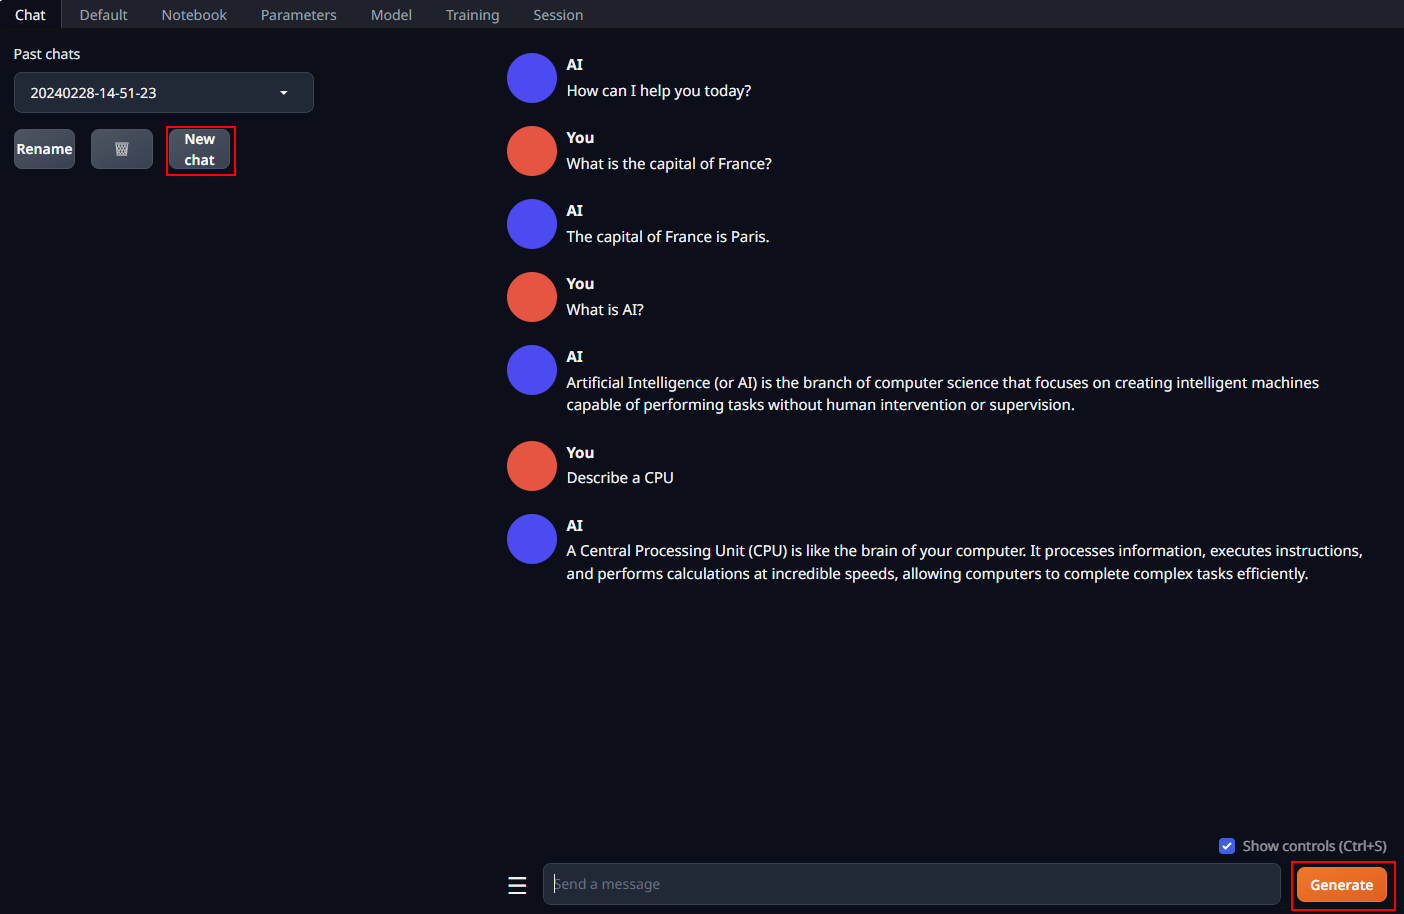
Chat with the Model
In the Chat tab, start new conversations with New chat.
Enter prompts into the textbox at the bottom and press the Generate button to receive responses.
Exit the WebUI
To shut down the WebUI server, use Ctrl+C in the Miniforge Prompt terminal where the WebUI Server is runing, then close your browser tab.
5. Advanced Usage
Using Instruct mode
Instruction-following models are models that are fine-tuned with specific prompt formats.
For these models, you should ideally use the instruct chat mode.
Under this mode, the model receives user prompts that are formatted according to prompt formats it was trained with.
To use instruct chat mode, select chat tab, scroll down the page, and then select instruct under Mode.
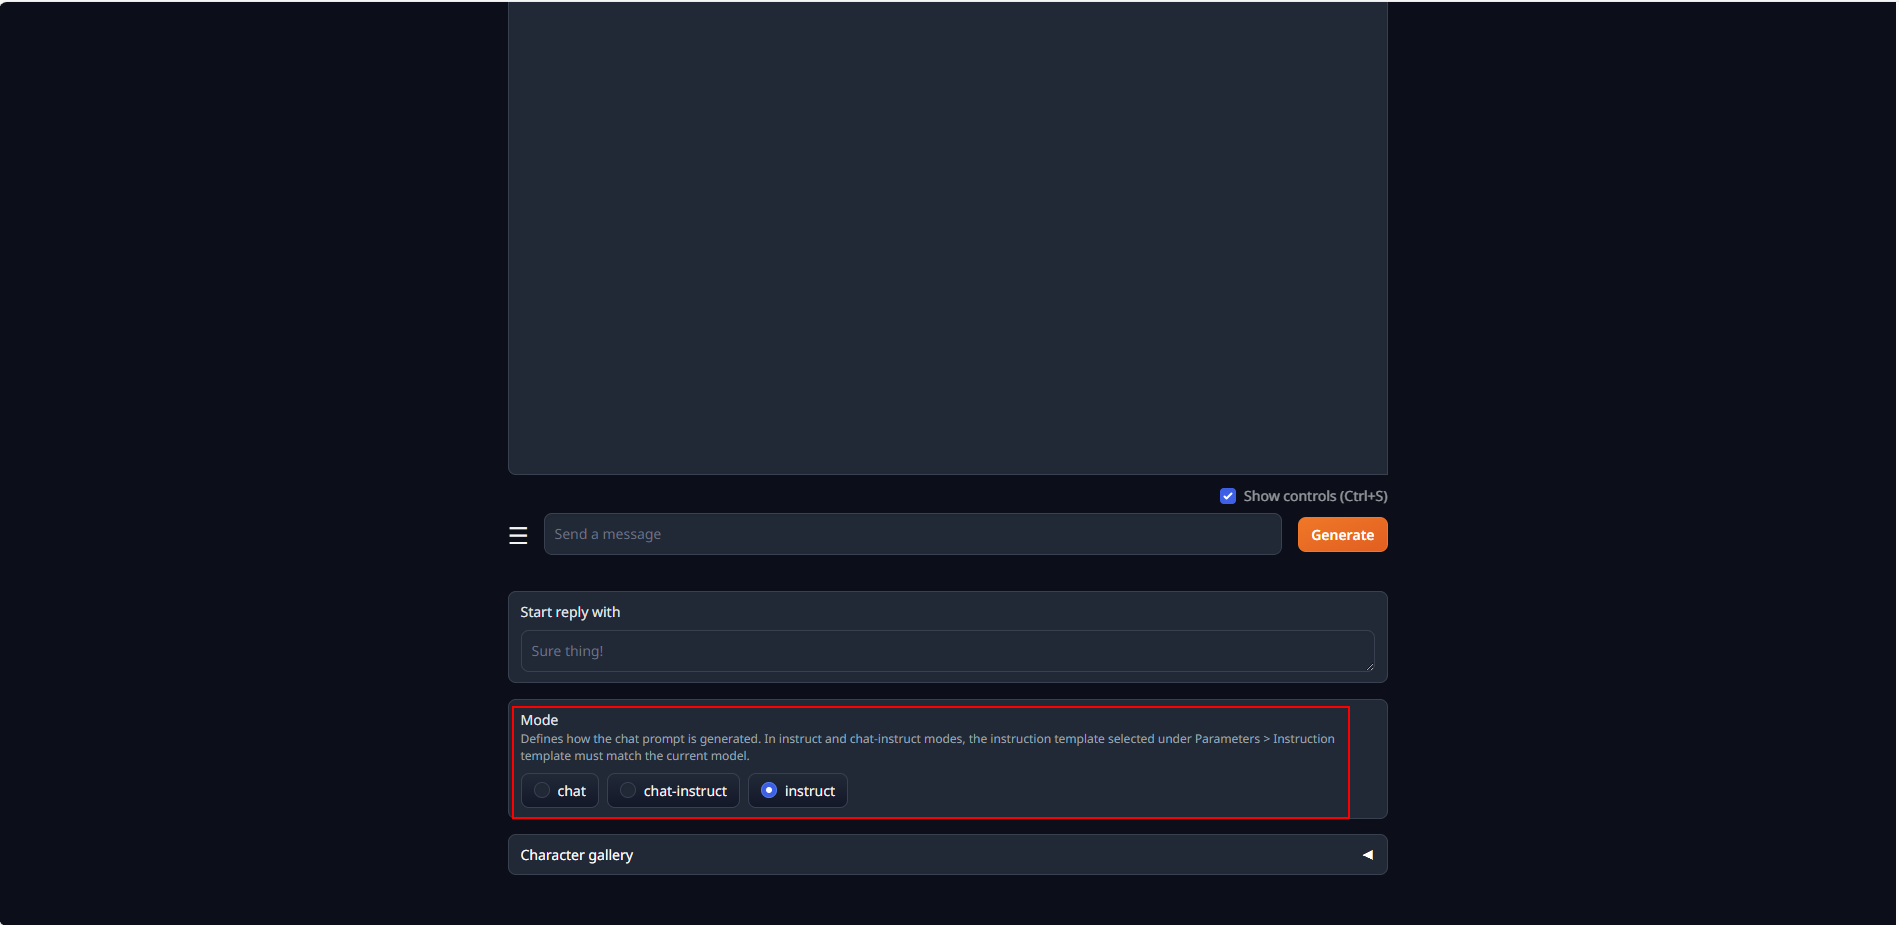
When a model is loaded, its corresponding instruction template, which contains prompt formatting, is automatically loaded.
If chat responses are poor, the loaded instruction template might be incorrect.
In this case, go to Parameters tab and then Instruction template tab.

You can verify and edit the loaded instruction template in the Instruction template field.
You can also manually select an instruction template from Saved instruction templates and click load to load it into Instruction template.
You can add custom template files to this list in /instruction-templates/ folder.
Tested models
We have tested the following models with ipex-llm using Text Generation WebUI.
| Model | Notes |
|---|---|
| llama-2-7b-chat-hf | |
| chatglm3-6b | Manually load ChatGLM3 template for Instruct chat mode |
| Mistral-7B-v0.1 | |
| qwen-7B-Chat |
Troubleshooting
Potentially slower first response
The first response to user prompt might be slower than expected, with delays of up to several minutes before the response is generated. This delay occurs because the GPU kernels require compilation and initialization, which varies across different GPU types.
Missing Required Dependencies
During model loading, you may encounter an ImportError like ImportError: This modeling file requires the following packages that were not found in your environment. This indicates certain packages required by the model are absent from your environment. Detailed instructions for installing these necessary packages can be found at the bottom of the error messages. Take the following steps to fix these errors:
- Exit the WebUI Server by pressing Ctrl+C in the Miniforge Prompt terminal.
- Install the missing pip packages as specified in the error message
- Restart the WebUI Server.
If there are still errors on missing packages, repeat the installation process for any additional required packages.
Compatiblity issues
If you encounter AttributeError errors like AttributeError: 'BaichuanTokenizer' object has no attribute 'sp_model', it may be due to some models being incompatible with the current version of the transformers package because the models are outdated. In such instances, using a more recent model is recommended.