| .husky | ||
| public | ||
| src | ||
| .gitignore | ||
| index.html | ||
| LICENSE | ||
| package.json | ||
| pnpm-lock.yaml | ||
| pnpm-workspace.yaml | ||
| README.md | ||
| screenshot.png | ||
| vite-lib.config.ts | ||
<status-indicator>
Colored circles that can pulse. That's it. That's the component.
Quick Start using a CDN
Copy the following to your HTML page:
<script type="module" src="https://esm.sh/@ayo-run/status-indicator"></script>

<status-indicator pulse status="positive">
  All systems operational
</status-indicator>
See example on CodePen: https://codepen.io/ayo-run/pen/RNorXrK
Note
In this example,
esm.shbundles the base class together with the component. For most use cases, that is good enough but, still, "it depends". Copying the code will work just fine, but it woudn't hurt to read around about the trade-offs how bundling affects your application.
Installation via NPM
If you want to install the library as a node module, you can install the published package and the base class via NPM:
# using npm
npm install web-component-base @ayo-run/status-indicator

# or using pnpm
pnpm add web-component-base @ayo-run/status-indicator
Usage: Imports
Without a bundler that resolves node_module imports for you, you can use import
maps:
<html>
  <head>
    <script type="importmap">
      {
        "imports": {
          "web-component-base": "./node_modules/web-component-base/dist/index.js",
          "status-indicator": "./node_modules/@ayo-run/status-indicator/dist/status-indicator.js"
        }
      }
    </script>
    <script type="module">
      import StatusIndicator from "status-indicator";
    </script>
  </head>
  <body>
    <!-- you can use the status-indicator component now -->
  </body>
</html>
Note
Using import maps can also work with the CDN: https://codepen.io/ayo-run/pen/emBdQRg
Usage: Attributes
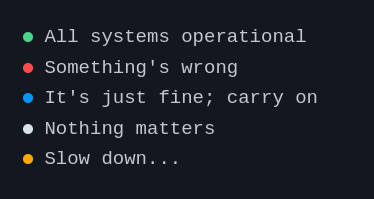
1. status attribute
To indicate the status that determines the color of the circle, set the status attribute of the status-indicator component to any of the following values: positive, negative, active, or intermediary.
<status-indicator status="positive"> All systems operational </status-indicator>
<status-indicator status="negative"> Something's wrong </status-indicator>
<status-indicator status="active"> It's just fine; carry on </status-indicator>
<status-indicator status="intermediary"> Slow down... </status-indicator>
<status-indicator> Nothing matters </status-indicator>
2. pulse animation
You can add the pulse attribute to make the circle... pulse
<status-indicator pulse status="positive">
  All systems operational
</status-indicator>
Result
A project by Ayo