# Run Ollama with IPEX-LLM on Intel GPU [ollama/ollama](https://github.com/ollama/ollama) is popular framework designed to build and run language models on a local machine; you can now use the C++ interface of [`ipex-llm`](https://github.com/intel-analytics/ipex-llm) as an accelerated backend for `ollama` running on Intel **GPU** *(e.g., local PC with iGPU, discrete GPU such as Arc, Flex and Max)*. See the demo of running LLaMA2-7B on Intel Arc GPU below.
You could also click here to watch the demo video.
> [!NOTE] > `ipex-llm[cpp]==2.5.0b20240527` is consistent with [v0.1.34](https://github.com/ollama/ollama/releases/tag/v0.1.34) of ollama. > > Our current version is consistent with [v0.1.39](https://github.com/ollama/ollama/releases/tag/v0.1.39) of ollama. ## Table of Contents - [Install IPEX-LLM for Ollama](./ollama_quickstart.md#1-install-ipex-llm-for-ollama) - [Initialize Ollama](./ollama_quickstart.md#2-initialize-ollama) - [Run Ollama Serve](./ollama_quickstart.md#3-run-ollama-serve) - [Pull Model](./ollama_quickstart.md#4-pull-model) - [Using Ollama](./ollama_quickstart.md#5-using-ollama) ## Quickstart ### 1. Install IPEX-LLM for Ollama IPEX-LLM's support for `ollama` now is available for Linux system and Windows system. Visit [Run llama.cpp with IPEX-LLM on Intel GPU Guide](./llama_cpp_quickstart.md), and follow the instructions in section [Prerequisites](./llama_cpp_quickstart.md#0-prerequisites) to setup and section [Install IPEX-LLM cpp](./llama_cpp_quickstart.md#1-install-ipex-llm-for-llamacpp) to install the IPEX-LLM with Ollama binaries. **After the installation, you should have created a conda environment, named `llm-cpp` for instance, for running `ollama` commands with IPEX-LLM.** ### 2. Initialize Ollama Activate the `llm-cpp` conda environment and initialize Ollama by executing the commands below. A symbolic link to `ollama` will appear in your current directory. - For **Linux users**: ```bash conda activate llm-cpp init-ollama ``` - For **Windows users**: Please run the following command with **administrator privilege in Miniforge Prompt**. ```cmd conda activate llm-cpp init-ollama.bat ``` > [!NOTE] > If you have installed higher version `ipex-llm[cpp]` and want to upgrade your ollama binary file, don't forget to remove old binary files first and initialize again with `init-ollama` or `init-ollama.bat`. **Now you can use this executable file by standard ollama's usage.** ### 3. Run Ollama Serve You may launch the Ollama service as below: - For **Linux users**: ```bash export OLLAMA_NUM_GPU=999 export no_proxy=localhost,127.0.0.1 export ZES_ENABLE_SYSMAN=1 source /opt/intel/oneapi/setvars.sh export SYCL_CACHE_PERSISTENT=1 ./ollama serve ``` - For **Windows users**: Please run the following command in Miniforge Prompt. ```cmd set OLLAMA_NUM_GPU=999 set no_proxy=localhost,127.0.0.1 set ZES_ENABLE_SYSMAN=1 set SYCL_CACHE_PERSISTENT=1 ollama serve ``` > [!NOTE] > Please set environment variable `OLLAMA_NUM_GPU` to `999` to make sure all layers of your model are running on Intel GPU, otherwise, some layers may run on CPU. > [!TIP] > If your local LLM is running on Intel Arcâ„¢ A-Series Graphics with Linux OS (Kernel 6.2), it is recommended to additionaly set the following environment variable for optimal performance before executing `ollama serve`: > > ```bash > export SYCL_PI_LEVEL_ZERO_USE_IMMEDIATE_COMMANDLISTS=1 > ``` > [!NOTE] > To allow the service to accept connections from all IP addresses, use `OLLAMA_HOST=0.0.0.0 ./ollama serve` instead of just `./ollama serve`. The console will display messages similar to the following: ### 4. Pull Model 
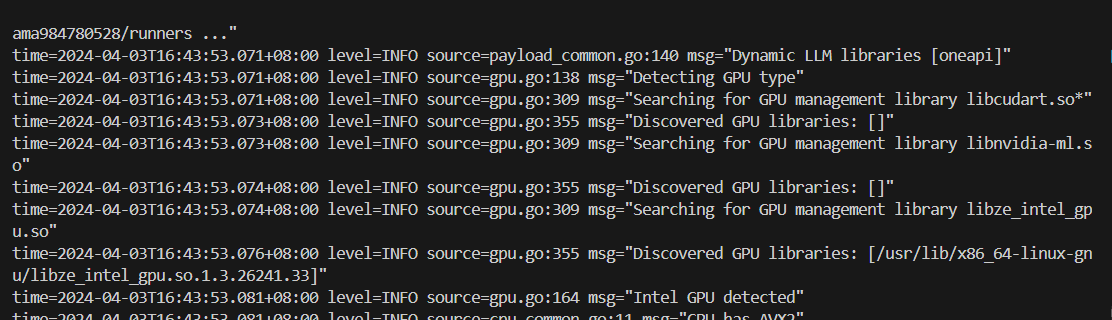
Keep the Ollama service on and open another terminal and run `./ollama pull
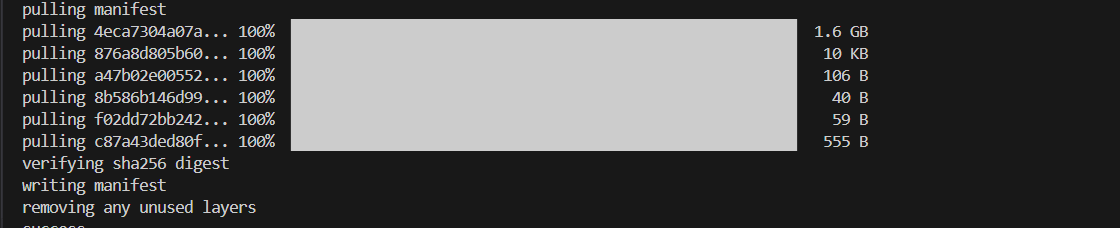
 ` in Linux (`ollama.exe pull ` in Windows) to automatically pull a model. e.g. `dolphin-phi:latest`: ### 5. Using Ollama #### Using Curl Using `curl` is the easiest way to verify the API service and model. Execute the following commands in a terminal. **Replace the
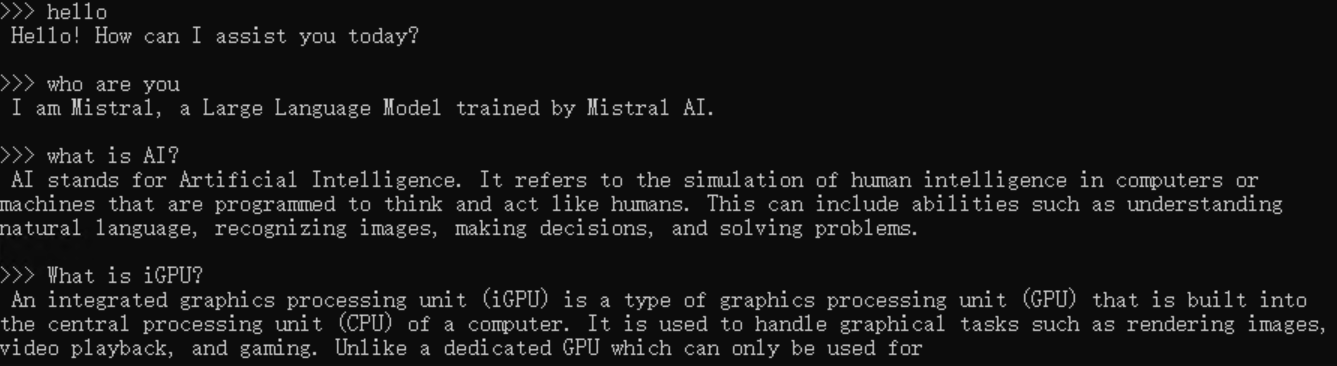
 with your pulled model**, e.g. `dolphin-phi`. - For **Linux users**: ```bash curl http://localhost:11434/api/generate -d ' { "model": "", "prompt": "Why is the sky blue?", "stream": false }' ``` - For **Windows users**: Please run the following command in Miniforge Prompt. ```cmd curl http://localhost:11434/api/generate -d " { \"model\": \"\", \"prompt\": \"Why is the sky blue?\", \"stream\": false }" ``` #### Using Ollama Run GGUF models Ollama supports importing GGUF models in the Modelfile, for example, suppose you have downloaded a `mistral-7b-instruct-v0.1.Q4_K_M.gguf` from [Mistral-7B-Instruct-v0.1-GGUF](https://huggingface.co/TheBloke/Mistral-7B-Instruct-v0.1-GGUF/tree/main), then you can create a file named `Modelfile`: ```bash FROM ./mistral-7b-instruct-v0.1.Q4_K_M.gguf TEMPLATE [INST] {{ .Prompt }} [/INST] PARAMETER num_predict 64 ``` Then you can create the model in Ollama by `ollama create example -f Modelfile` and use `ollama run` to run the model directly on console. - For **Linux users**: ```bash export no_proxy=localhost,127.0.0.1 ./ollama create example -f Modelfile ./ollama run example ``` - For **Windows users**: Please run the following command in Miniforge Prompt. ```cmd set no_proxy=localhost,127.0.0.1 ollama create example -f Modelfile ollama run example ``` An example process of interacting with model with `ollama run example` looks like the following: