# Install BigDL-LLM on Windows for Intel GPU
This guide applies to Intel Core Ultra and Core 12 - 14 gen integrated GPUs, as well as Intel Arc Series GPU.
## Install GPU driver
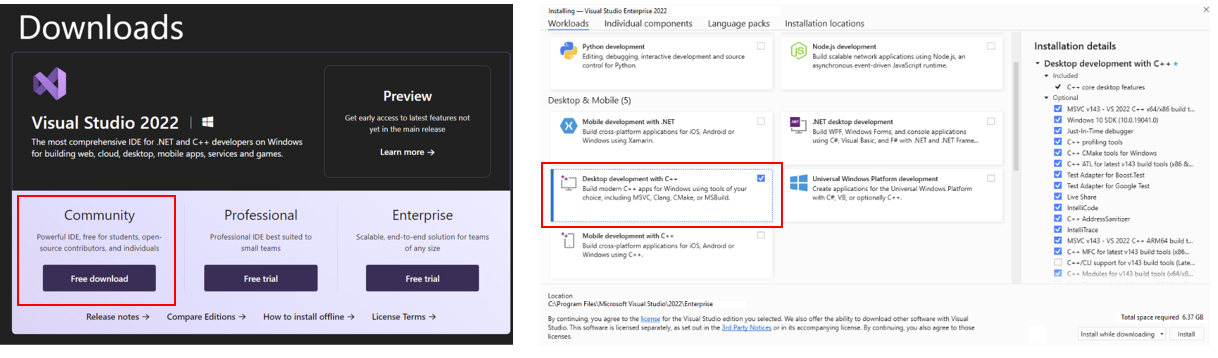
* Download and Install Visual Studio 2022 Community Edition from the [official Microsoft Visual Studio website](https://visualstudio.microsoft.com/downloads/). Ensure you select the **Desktop development with C++ workload** during the installation process.
> Note: The installation could take around 15 minutes, and requires at least 7GB of free disk space.
> If you accidentally skip adding the **Desktop development with C++ workload** during the initial setup, you can add it afterward by navigating to **Tools > Get Tools and Features...**. Follow the instructions on [this Microsoft guide](https://learn.microsoft.com/en-us/cpp/build/vscpp-step-0-installation?view=msvc-170#step-4---choose-workloads) to update your installation.
>
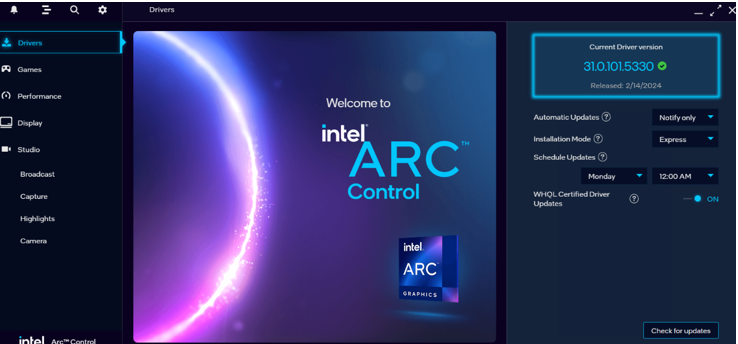
>  * Download and install the latest GPU driver from the [official Intel download page](https://www.intel.com/content/www/us/en/download/785597/intel-arc-iris-xe-graphics-windows.html). A system reboot is necessary to apply the changes after the installation is complete.
> Note: the process could take around 10 minutes. After reboot, check for the **Intel Arc Control** application to verify the driver has been installed correctly. If the installation was successful, you should see the **Arc Control** interface similar to the figure below
>
* Download and install the latest GPU driver from the [official Intel download page](https://www.intel.com/content/www/us/en/download/785597/intel-arc-iris-xe-graphics-windows.html). A system reboot is necessary to apply the changes after the installation is complete.
> Note: the process could take around 10 minutes. After reboot, check for the **Intel Arc Control** application to verify the driver has been installed correctly. If the installation was successful, you should see the **Arc Control** interface similar to the figure below
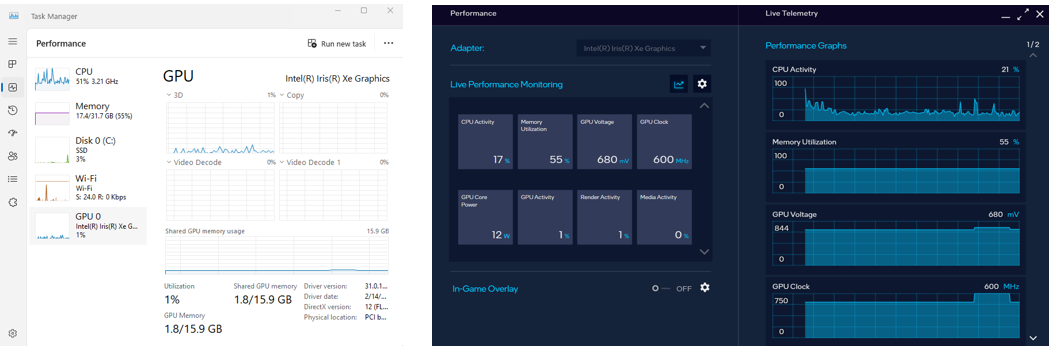
>  * To monitor your GPU's performance and status, you can use either use the **Windows Task Manager** (see the left side of the figure below) or the **Arc Control** application (see the right side of the figure below) or :
>
* To monitor your GPU's performance and status, you can use either use the **Windows Task Manager** (see the left side of the figure below) or the **Arc Control** application (see the right side of the figure below) or :
>  ## Setup Python Environment
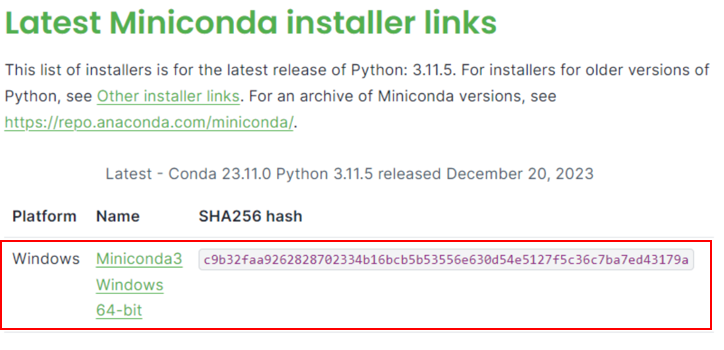
* Visit [Miniconda installation page](https://docs.anaconda.com/free/miniconda/), download the **Miniconda installer for Windows**, and follow the instructions to complete the installation.
>
## Setup Python Environment
* Visit [Miniconda installation page](https://docs.anaconda.com/free/miniconda/), download the **Miniconda installer for Windows**, and follow the instructions to complete the installation.
>  * After installation, open the **Anaconda Prompt**, create a new python environment `llm`:
```bash
conda create -n llm python=3.9 libuv
```
* Activate the newly created environment `llm`:
```bash
conda activate llm
```
## Install oneAPI
* With the `llm` environment active, use `pip` to install the **OneAPI Base Toolkit**:
```bash
pip install dpcpp-cpp-rt==2024.0.2 mkl-dpcpp==2024.0.0 onednn==2024.0.0
```
## Install `bigdl-llm`
* With the `llm` environment active, use `pip` to install `bigdl-llm` for GPU:
```bash
pip install --pre --upgrade bigdl-llm[xpu] --extra-index-url https://pytorch-extension.intel.com/release-whl/stable/xpu/cn/
```
> Note: If there are network issues when installing IPEX, refer to [this guide](https://bigdl.readthedocs.io/en/latest/doc/LLM/Overview/install_gpu.html#install-bigdl-llm-from-wheel) for more details.
* You can verfy if bigdl-llm is successfully by simply importing a few classes from the library. For example, in the Python interactive shell, execute the following import command:
```python
from bigdl.llm.transformers import AutoModel,AutoModelForCausalLM
```
## A quick example
* Next step you can start play with a real LLM. We use [phi-1.5](https://huggingface.co/microsoft/phi-1_5) (an 1.3B model) for demostration. You can copy/paste the following code in a python script and run it.
> Note: to use phi-1.5, you may need to update your transformer version to 4.37.0.
> ```
> pip install -U transformers==4.37.0
> ```
> Note: when running LLMs on Intel iGPUs for Windows users, we recommend setting `cpu_embedding=True` in the from_pretrained function.
> This will allow the memory-intensive embedding layer to utilize the CPU instead of iGPU.
```python
import torch
from bigdl.llm.transformers import AutoModelForCausalLM
from transformers import AutoTokenizer, GenerationConfig
generation_config = GenerationConfig(use_cache = True)
tokenizer = AutoTokenizer.from_pretrained("microsoft/phi-1_5", trust_remote_code=True)
# load Model using bigdl-llm and load it to GPU
model = AutoModelForCausalLM.from_pretrained(
"microsoft/phi-1_5", load_in_4bit=True, cpu_embedding=True, trust_remote_code=True)
model = model.to('xpu')
# Format the prompt
question = "What is AI?"
prompt = " Question:{prompt}\n\n Answer:".format(prompt=question)
# Generate predicted tokens
with torch.inference_mode():
input_ids = tokenizer.encode(prompt, return_tensors="pt").to('xpu')
output = model.generate(input_ids, do_sample=False, max_new_tokens=32, generation_config = generation_config).cpu()
output_str = tokenizer.decode(output[0], skip_special_tokens=True)
print(output_str)
```
* An example output on the laptop equipped with i7 11th Gen Intel Core CPU and Iris Xe Graphics iGPU looks like below.
```
Question:What is AI?
Answer: AI stands for Artificial Intelligence, which is the simulation of human intelligence in machines.
```
* After installation, open the **Anaconda Prompt**, create a new python environment `llm`:
```bash
conda create -n llm python=3.9 libuv
```
* Activate the newly created environment `llm`:
```bash
conda activate llm
```
## Install oneAPI
* With the `llm` environment active, use `pip` to install the **OneAPI Base Toolkit**:
```bash
pip install dpcpp-cpp-rt==2024.0.2 mkl-dpcpp==2024.0.0 onednn==2024.0.0
```
## Install `bigdl-llm`
* With the `llm` environment active, use `pip` to install `bigdl-llm` for GPU:
```bash
pip install --pre --upgrade bigdl-llm[xpu] --extra-index-url https://pytorch-extension.intel.com/release-whl/stable/xpu/cn/
```
> Note: If there are network issues when installing IPEX, refer to [this guide](https://bigdl.readthedocs.io/en/latest/doc/LLM/Overview/install_gpu.html#install-bigdl-llm-from-wheel) for more details.
* You can verfy if bigdl-llm is successfully by simply importing a few classes from the library. For example, in the Python interactive shell, execute the following import command:
```python
from bigdl.llm.transformers import AutoModel,AutoModelForCausalLM
```
## A quick example
* Next step you can start play with a real LLM. We use [phi-1.5](https://huggingface.co/microsoft/phi-1_5) (an 1.3B model) for demostration. You can copy/paste the following code in a python script and run it.
> Note: to use phi-1.5, you may need to update your transformer version to 4.37.0.
> ```
> pip install -U transformers==4.37.0
> ```
> Note: when running LLMs on Intel iGPUs for Windows users, we recommend setting `cpu_embedding=True` in the from_pretrained function.
> This will allow the memory-intensive embedding layer to utilize the CPU instead of iGPU.
```python
import torch
from bigdl.llm.transformers import AutoModelForCausalLM
from transformers import AutoTokenizer, GenerationConfig
generation_config = GenerationConfig(use_cache = True)
tokenizer = AutoTokenizer.from_pretrained("microsoft/phi-1_5", trust_remote_code=True)
# load Model using bigdl-llm and load it to GPU
model = AutoModelForCausalLM.from_pretrained(
"microsoft/phi-1_5", load_in_4bit=True, cpu_embedding=True, trust_remote_code=True)
model = model.to('xpu')
# Format the prompt
question = "What is AI?"
prompt = " Question:{prompt}\n\n Answer:".format(prompt=question)
# Generate predicted tokens
with torch.inference_mode():
input_ids = tokenizer.encode(prompt, return_tensors="pt").to('xpu')
output = model.generate(input_ids, do_sample=False, max_new_tokens=32, generation_config = generation_config).cpu()
output_str = tokenizer.decode(output[0], skip_special_tokens=True)
print(output_str)
```
* An example output on the laptop equipped with i7 11th Gen Intel Core CPU and Iris Xe Graphics iGPU looks like below.
```
Question:What is AI?
Answer: AI stands for Artificial Intelligence, which is the simulation of human intelligence in machines.
```